Wednesday, December 7, 2011

Circle Ceiling


Ceilings are so cool - when they're all finished and my neck has recovered!

This is one of several projects in this lovely home. It started out as a silver ceiling, but the fabric chosen for the curtains (not up yet) has black and gold, so the ceiling got a metallic silver and gold background with this Sheri Zeman Loft 101 stencil. It looks sort of like bubbles. I love this line of stencils and can't wait to have an excuse to use more of them!


Gravity is not my friend when stenciling a ceiling, so fortunately I had help putting this up.(Thank you Jeannine!) I thought it would take two of us about three hours. We were there until 8:15 PM. Fortunately the clients were in Hawaii for Thanksgiving.

The stencil is square. The ceiling is round. It didn't line up completely which meant we had to finesse the 'bubbles' a lot. But it was completely worth it. And wearing a collar to support my neck is the only way to go. (Thank you Lessa!)


Here is my trusty helper, Jeannine. The pictures are all courtesy of her phone.
 And here is the finished ceiling.

It was a hit!! The clients and the decorator loved it which is all that's really important.

Thanks for visiting!


Monday, July 4, 2011

Amazing European-style House

I just finished a kitchen island in this amazing house. It looks like it came straight out of some European countryside. Here is the back of the house as you drive up the hill after being buzzed in through the gate. (I think she said they have 8 acres.)


This is the front.
 What you don't see are all the porticos, terraces, and other beautiful architectural features, not to mention a HUGE pond and all the container plantings and gardens around the other side.

Here's the el that connects to the garages.

 And here are the garages, all four - with gables (not sure what's up there).
  And this is the 'shop end' of the garages.
 Truly a lovely home in a gorgeous bucolic setting.

The interior is just as amazing. But it was built in the 90s when all the cabinetry was made to look alike. There's tons of millwork and cabinets in the kitchen 'area' (about the size of my first house) and it all looks the same, so it all fades into itself. The designer wanted the island to be a distressed black to set it apart and give some depth to the kitchen. So here's before:
This island really goes on forever.
 There's a raised bar area on the back part which has 2 doors to either side and 5 doors under it. A prep sink, a stove area, the dishwasher area and the bookcase end. When I had all the doors and drawers in my studio it looked like an entire kitchen.

Here's after.  The hardware wasn't on yet, but it's clean and simple in a rubbed bronze.
The bookcase and bar.
 The bookcase heading toward the prep sink area.
 The stove side.
Detail of the bookcase. There's another grape detail on the other end of the bar.
 Drawer close-up.

To give you a little taste of the rest of the house, here are some pictures of the sunroom. The homewoner did this ceiling herself! There are two of these fixtures.Very cool, rusted patina with prisms and candles in them.
 A bureau/buffet in the sunroom.
 The vignette on the top of the bureau/buffet.
I get to work in some of the most gorgeous homes!

Monday, June 27, 2011

Restored Metal Art

I got a call from a guy who had a piece of old metal art he wanted the colors restored on. (Thanks Paul, for the referral.) The piece hangs outside so it's pretty rusty and faded.

OMG!!! As soon as I saw this in the trunk of his car I knew I wanted to work on it. (We met in a Starbucks parking lot - he wanted to surprise his wife with it all finished.)

We negotiated a price and I left with it in the back of MY car. It looked like this:

 About 30" wide and a foot tall.

I had a bunch of earthy and bronze-y-orange metallics but nothing in the vibrant green I wanted for the gecko or shimmery blue I wanted for Kokopeli. So the next day (on our way to Camano Island for a vintage fair - more on that later) we went up to Daniel Smith in Seattle. Daniel Smith is a really amazing place for all kinds of art supplies. You can find them online here, but I'm lucky to have an actual store about an hour away. Really lucky, because I had absolutely no idea what I wanted, just a conviction that they'd have it. And thanks to Alice I got just exactly what the piece needed.

Here's how it turned out.


The angle and lighting are everything when I'm trying to photograph metallics, and because of the angle you can see the bling in one frame but not in another in the same pic. I intentionally left some of the rust, it wouldn't have cleaned up perfectly anyway and the piece has such a great patina. Now I just have to clear coat it and it's done.

I have the best job in the world.


Wednesday, June 22, 2011

Victoria, B.C.and Ziplines

We just got back from a trip to Victoria. Doubly nice because the weather there was lovely while back home in the Puget Sound area it continued to rain.

Victoria is a perfect place to do what we love to do on vacation: eat, shop, eat,  look at art, and eat. You'll have noticed a theme here, so we walk a lot, which we also like to do. And this time my lovely, adventurous husband found us ziplines!!

If you have not been on a zipline you have missed out on one of life's coolest adrenaline rushes. Of the four of us (husband, sister, brother-in-law, me) I was the only one who had not jumped out of an airplane, so I can't tell you how it compares to that adrenaline-charged 'sport.' I can tell you that it is a TON of fun. And I am known for being the wimp in my family.

We've looked into it before, in Hawaii, but this is the first time it was affordable. (Go here for the whole story on Adrena Line in Sooke Harbor, B.C.) There are 8 ziplines and a couple of suspension bridges and it is amazing. On about the 6th line when you really have it down you go through a photo op. Here is my photo:
And here is Jim's:
Now, my husband is a pilot, and among other things he likes to go upside down just about any time he gets the chance. He did not intend to have the line twist in this particular direction to the camera, but really - it's perfect.

Oh, and the oldest person Adrena Line has zipped? 94. He apparently had to go tandem with a guide, but he went!

More later on Victoria with loads of cool pics of places and stuff.

Saturday, June 4, 2011

The YWCA Armoire

 Last year I had a great opportunity to be part of the renovation of a 'new' building for the Tacoma YWCA transitional housing for women, children, and their pets (this is one of the few shelters that takes pets).

After the YWCA had completed the renovation of the plumbing, electrical, and structure of the 1930s building they ran out of money. The board decided to do basic institutional necessities for the 22 units and try later to upgrade one unit at a time as funds were available.

A Tacoma designer went to the board and proposed that she recruit designers and decorators to volunteer to finish the units. The board agreed, thinking nothing would come of it. But they were wrong!

Twenty designers volunteered. Each was assigned a unit (a couple did two). They donated their time (and money) and got donations of materials, furniture, art, and labor and finished the 22 units in style. Each unit has a kitchen and a bathroom. Some are studios, some have one bedroom, some have two bedrooms. There are new kitchen fixtures, new tile in kitchens and bathrooms, new cabinets and built-ins, and each unit is furnished beautifully. I wish I had pictures of them all, they were HGTV-reveal-AMAZING! Unfortunately I don't have any pictures of the units. But I can show you a little part.

I worked with decorator Joyce Weir on her unit. The biggest piece I got to transform was a large pine armoire donated by a friend of Joyce's.

Here is the before:


And here is after:
I'll put the technical info in another post for anyone who is interested in how to do it. Or leave me a comment and I can get the info to you.


This is a picture (with li'l ol' me) of the armoire in the unit:


It was such a cool project to get to help out with.

Wednesday, June 1, 2011

You have no idea!

I just spent about two hours trying to get my layout to work the way I wanted it to. I think it was Einstein who said that the definition of insanity is doing the same thing and expecting different results, but finally, for some unknown reason, the same thing I kept doing (recommended by all the internet sites I was looking to for help) WORKED! Apologies for the run-on sentence. Yay! I can now get on with my blog life.

Sunday, May 8, 2011

Decorative Artisan of the Month!

Here it is! The interview (click here) I did for Kathy Carroll's company Faux by Kathy. The finish at the top of her home page this month is mine as well. If you ever need ANYTHING in the way of decorative painting supplies Kathy most likely has it.

[In acceptance-speech Oscar mode] Thank you to my family (best on earth), and  to graphic designer/photographer Wil Randolph, decorator Joyce Weir, decorator Anne Steward, and all of the lovely clients I've had the privilege of working with (you know who you are)!

The Rest of the Kitchen

So the sagey cabinets were such a hit that I got to do the rest of the kitchen. I just finished last week and it was so much fun. The client AND the decorator both loved the way it turned out and that made me a happy camper!!

I did this job with Annie Sloan Chalk Paint which I got from Anne Skougard in California, but now her daughter Kellyanne (Kelly@thebellabungalow.com ) will be selling it up here in the Northwest. Yay! (If you're interested in the colors I used or how I applied it - 3.25 qts for 60 linear feet of cabinets including the island - leave me a comment.)

Annie Sloan Chalk Paint is a great product that doesn't need primer. Also not supposed to require sanding but I did clean the cabinets with Simple Green (lemon, don't like the smell of the green one) and a sanding sponge.

Here are the befores:
 

And here are the afters:
And this is looking toward the sagey cabinets. If you look closely you can see the stripes I did in the entry/hallway.
 There's also a huge island just out of camera range that's the same as the white cabinets with a bit darker glaze.

Here's what Anne Steward, the decorator on this project, said, "You did one of my most favorite jobs for Sue J. - it just lightened up and "woke up" that kitchen!!   Such an amazing transformation....LOVE IT!!  Now I want to be there because it's so bright and inviting..really is beautiful.  Such a great joy - thank you so much.  She's so excited, and she loves her new hardware...her house is really coming along."

I get to have too much fun in this job! On to Las Cruces, New Mexico to do a couple of jobs and have some R&R. Rumor has it there's sun there. Here in the solar-deprived Northwest it's hard to imagine actually being warm and dry...

Tuesday, April 26, 2011

Monday, April 18, 2011

Sagey Cabinets

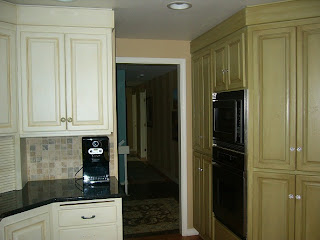
This is a recent job I did with designer Anne Steward. She wanted this client's cabinets done in a sagey green. I overglazed them to knock them back a bit. The client liked them so much that I am now doing the kitchen and island in cream colors! Stay tuned for those pictures in a couple of weeks.

Before:


After:
I was amazed when I went back and looked at the before pictures. These cabinets now look like they've always been this way!


This last picture was taken before I got the wine cubby installed and before the glass knobs went on. But you can see all of these cabinets at once.